02 配置bean
本节内容:(加粗为本节内容,未加粗为不重要内容)
- 配置形式:基于XML文件的方式;基于注解的方式
- Bean的配置方式:通过全类名(反射);通过工厂方法(静态工厂方法&实例工厂方法);FactoryBean
- IOC容器BeanFactory & ApplicationContext概述
- 依赖注入的方式:属性注入;构造器注入
1. 基于XML文件的方式
1 | <bean id="helloWord" class="hello.HelloWorld"> |
- id:标识容器中的bean,一定是唯一的
- class:全类名,反射方法.需要在该类中有一个无参的构造方法
1 | public static void main(String[] args) { |
ApplicationContext:在SpringIOC容器读取Bean配置创建Bean实例之前,必须对他进行实例化.只有在容器实例化后才可以从IOC容器中获取Bean并使用
Spring提供了两种类型的IOC容器实现
BeanFactory:IOC容器的基本实现
ApplicationContext:提供了更多的高级特性,是BeanFactory的子接口
BeanFactory是Spring框架的基础设置,面向Spring本身
ApplicationContext面向使用Spring框架的开发者,几乎所有的应用场合都直接使用ApplicationContext而不是底层的BeanFactory
无论使用何种方式,配置文件是相同的
ApplicationContext的主要实现类:
- ClassPathXmlApplicationContext:从类路径下加载配置文件
- FileSystemXmlApplicationContext:从文件系统下加载配置文件
ConfigurableApplicationContext扩展于ApplicationContext,新增两个主要方法:reflush()和close(),让ApplicationContext具有启动刷新关闭上下文的能力
ApplicationContext在初始化上下文时就实例化所有单例的Bean
WebApplicationContext是专门为Web应用而准备的,它允许从相对于Web根目录的路径中完成初始化工作
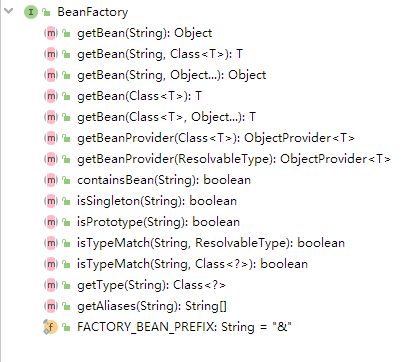
1.1 BeanFactory中的方法:
1.2 依赖注入的方式:
- 属性注入
- 构造器注入
- 工厂方法注入(很少不推荐)
1.2.1 属性注入:
- 即通过setter方法注入Bean的属性值或依赖的对象(上面的HelloWorld例子就是)
- 属性注入使用
<pproperty>元素,使用name属性指定Bean的属性名称,value属性或<value>子节点指定属性值 - 属性注入是实际应用中最常用的注入方式`
1.2.2 构造方法注入:
通过构造方法注入Bean的属性值或依赖的对象,它保证了Bean实例在实例化后就可以使用
构造器注入在
<constructor-arg>元素中声明属性,<constructor-arg>中没有name属性示例:
car.java:
1
2
3
4
5
6
7
8
9
10
11
12
13
14
15
16
17
18
19
20
21
22
23
24
25
26
27
28
29
30
31
32
33
34
35
36
37package car;/*
* @Author Sheng WenZeng
* @Date 2019/8/4 16:48
* @Version 1.0
*/
/**
* @author Sheng Wenzeng
* @ClassName Car
* @Description TODO
* @Date 2019/8/4 16:48
* @Version 1.0
*/
public class Car {
private String color;
private int speed;
private double price;
public Car(String color, int speed) {
this.color = color;
this.speed = speed;
}
public Car(String color, double price) {
this.color = color;
this.price = price;
}
public String toString() {
return "Car{" +
"color='" + color + '\'' +
", speed='" + speed + '\'' +
", price='" + price + '\'' +
'}';
}
}applicationContext.xml:
1
2
3
4
5
6
7
8
9<bean id="car" class="car.Car">
<constructor-arg value="red" index="0" type="java.lang.String"/>
<constructor-arg value="100" index="1" type="int"/>
</bean>
<bean id="car_1" class="car.Car">
<constructor-arg value="red" index="0" type="java.lang.String"/>
<constructor-arg value="100" index="1" type="double"/>
</bean>test.java:
1
2
3
4
5
6
7
8
9
10
11
12
13
14
15
16
17
18
19
20
21
22
23
24
25
26
27package car;/*
* @Author Sheng WenZeng
* @Date 2019/8/4 16:51
* @Version 1.0
*/
import org.springframework.context.ApplicationContext;
import org.springframework.context.support.ClassPathXmlApplicationContext;
/**
* @author Sheng Wenzeng
* @ClassName tesf
* @Description TODO
* @Date 2019/8/4 16:51
* @Version 1.0
*/
public class test {
public static void main(String[] args) {
ApplicationContext applicationContext = new ClassPathXmlApplicationContext("applicationContext.xml");
Car car = (Car) applicationContext.getBean("car");
System.out.println(car.toString());
Car car_1 = (Car) applicationContext.getBean("car_1");
System.out.println(car_1.toString());
}
}运行后输出:
1
2
3
4
5"C:\Program Files\Java\jdk1.8.0_211\bin\java.exe"...
Car{color='red', speed='100', price='0.0'}
Car{color='red', speed='0', price='100.0'}
Process finished with exit code 0
1.3 注入的值:
1.3.1 字面值
字面值:可用字符串表示的值,可以通过
<value>元素标签或<value>属性进行注入基本数据类型及其封装类、String等类型都可以采取字面值注入的方式
若字面值包含特殊字符,可以使用
<![CDATA[]]>把字面值包裹起来例:
1
2
3
4
5
6<bean id="car_1" class="car.Car">
<constructor-arg value="red" index="0" type="java.lang.String"/>
<constructor-arg index="1" type="double">
<value><![CDATA[10^2]]></value>
</constructor-arg>
</bean>这样注入的值就是
10^2
1.3.2 引用其他Bean
- 组成应用程序的Bean经常需要相互协作以完成应用程序的功能,要
使Bean能够相互访问,就必须在Bean配置文件中指定对Bean的引用 - 在Bean的配置文件中,可以通过
<ref>元素或<ref>属性为Bean的属性或构造器参数指定对Bean的引用 - 也可以
在属性或构造器中包含Bean的声明,这样的Bean成为内部Bean
person.java
1 | package person;/* |
applicationContext.xml
1 | <bean id="person" class="person.Person"> |
Main.java
1 | Person person = (Person) applicationContext.getBean("person"); |
运行结果:
1 | "C:\Program Files\Java\jdk1.8.0_211\bin\java.exe" ... |
1.3.3 内部Bean
- 当Bean实例仅仅给一个特定的属性使用时,可以将其声明为内部Bean.内部Bean声明直接包含在
<property>或<constructor-arg>元素里,不需要设置任何id或name属性 - 内部Bean不能使用在其他任何地方
修改以上的xml文件为:
1 | <bean id="person" class="person.Person"> |
运行结果相同
1.3.4 Null值
可以使用专用的<null/>元素标签为Bean的字符串或其他对象类型的属性注入null值(意义不大,因为默认值就是null)
1.3.5 级联属性
和Strus、Hiberante等框架一样,Spring支持级联属性的配置
级联属性:
1 | <bean id="person" class="person.Person"> |
1.3.6 集合属性
在Spring中可以通过一组内置的xml标签(例如:<list>,<set>或<map>)来配置集合属性
1.3.6.1 配置List
- 配置java.util.List类型的属性,需要指定
<list>标签,在标签里包含以下元素,这些标签可以通过<value>指定简单的常量值,通过<ref>制定对其他Bean的引用.通过<null/>指定空元素,甚至可以内嵌其他集合 - 数组的定义和List一样,都使用
<List> - 配置java.util.Set需要使用
<set>标签,定义元素的方法和List一样
car.java
1 | package collection;/* |
person.java
1 | package collection;/* |
main.java
1 | package collection;/* |
applicationContext.xml
1 | <bean id="collectionCar_1" class="collection.car"> |
运行结果:
1 | person{name='ZhangSan', age=21, cars=[car{color='red', speed=100, price=1000.0}, car{color='yellow', speed=50, price=500.0}]} |
1.3.6.2 配置Map
java.util.Map通过
<map>标签定义,<map>标签里可使用多个<entry>作为子标签.每个条目包含一个键和一个值必须在
<key>标签中定义键因为键和值的类型没有限制,所有可以自由地为他们指定
<value>,<ref>,<bean>或<null>元素可以将Map的键和值作为
<entry>的属性定义:简单常量使用key和value来定义;Bean应用通过key-ref和value-ref属性定义Car.java
1
2
3
4
5
6
7
8
9
10
11
12
13
14
15
16
17
18
19
20
21
22
23
24
25
26
27
28
29
30
31
32
33
34
35
36
37
38
39
40package person;/*
* @Author Sheng WenZeng
* @Date 2019/8/10 16:08
* @Version 1.0
*/
/**
* @author Sheng Wenzeng
* @ClassName Car
* @Description TODO
* @Date 2019/8/10 16:08
* @Version 1.0
*/
public class Car {
private String color;
public String toString() {
return "Car{" +
"color='" + color + '\'' +
", speed=" + speed +
", price=" + price +
'}';
}
private int speed;
private double price;
public void setColor(String color) {
this.color = color;
}
public void setSpeed(int speed) {
this.speed = speed;
}
public void setPrice(double price) {
this.price = price;
}
}person.java
1
2
3
4
5
6
7
8
9
10
11
12
13
14
15
16
17
18
19
20
21
22
23
24
25
26
27
28
29
30
31
32
33
34
35
36
37
38
39
40
41package person;/*
* @Author Sheng WenZeng
* @Date 2019/8/10 16:06
* @Version 1.0
*/
import java.util.Map;
/**
* @author Sheng Wenzeng
* @ClassName person
* @Description TODO
* @Date 2019/8/10 16:06
* @Version 1.0
*/
public class person {
private String name;
private int age;
private Map<String, Car> cars;
public void setName(String name) {
this.name = name;
}
public String toString() {
return "person{" +
"name='" + name + '\'' +
", age=" + age +
", cars=" + cars +
'}';
}
public void setAge(int age) {
this.age = age;
}
public void setCars(Map<String, Car> cars) {
this.cars = cars;
}
}Main.java
1
2
3
4
5
6
7
8
9
10
11
12
13
14
15
16
17
18
19
20
21
22
23package person;/*
* @Author Sheng WenZeng
* @Date 2019/8/10 16:13
* @Version 1.0
*/
import org.springframework.context.ApplicationContext;
import org.springframework.context.support.ClassPathXmlApplicationContext;
/**
* @author Sheng Wenzeng
* @ClassName Main
* @Description TODO
* @Date 2019/8/10 16:13
* @Version 1.0
*/
public class Main {
public static void main(String[] args) {
ApplicationContext applicationContext = new ClassPathXmlApplicationContext("applicationContext.xml");
person person = (person) applicationContext.getBean("person_1");
System.out.println(person.toString());
}
}applicationContext.xml
1
2
3
4
5
6
7
8
9
10
11
12
13
14
15
16
17
18
19
20
21
22
23
24
25
26
27
28
<beans xmlns="http://www.springframework.org/schema/beans"
xmlns:xsi="http://www.w3.org/2001/XMLSchema-instance"
xsi:schemaLocation="http://www.springframework.org/schema/beans http://www.springframework.org/schema/beans/spring-beans.xsd">
<bean id="car_1" class="person.Car">
<property name="color" value="red"/>
<property name="speed" value="100"/>
<property name="price" value="1000"/>
</bean>
<bean id="car_2" class="person.Car">
<property name="color" value="yellow"/>
<property name="speed" value="200"/>
<property name="price" value="2000"/>
</bean>
<bean id="person_1" class="person.person">
<property name="name" value="ZhangSan"/>
<property name="age" value="21"/>
<property name="cars">
<map>
<entry key="A" value-ref="car_1"/>
<entry key="B" value-ref="car_2"/>
</map>
</property>
</bean>
</beans>运行结果为:
1
person{name='ZhangSan', age=21, cars={A=Car{color='red', speed=100, price=1000.0}, B=Car{color='yellow', speed=200, price=2000.0}}}
1.3.7 配置Properties
使用<props>定义java.util.Properties,该标签使用多个<prop>作为子标签,每个<prop>标签必须定义key属性
DataSource.java
1 | package person;/* |
Main.java
1 | package person;/* |
applicationContext.xml
1 | <!--配置Properties属性值--> |
运行结果:
1 | {driverClass=com.mysql.cj.jdbc.Driver, user=root, password=1234, jdbcUrl=jdbc:mysql://test} |
使用utility scheme定义集合
- 使用基本的集合标签定义集合时,不能将集合作为独立的Bean定义,导致其他的Bean无法引用该集合,所以无法在不同Bean之间共享集合
- 可以使用util schema里的集合标签定义独立的集合Bean.需要注意的是,必须在
<bean>根元素里添加util schema定义
在applicationContext.xml中添加
xmlns:util="http://www.springframework.org/schema/util",在xsi:schemaLocation中添加http://www.springframework.org/schema/util http://www.springframework.org/schema/util/spring-util-4.0.xsd:1
2
3
4
5
6
7
8
9
10
11
12
13
14
15
16
17
18
19
20
21
22
23
24
25
26
27
28
29
30
<beans xmlns="http://www.springframework.org/schema/beans"
xmlns:xsi="http://www.w3.org/2001/XMLSchema-instance"
xmlns:util="http://www.springframework.org/schema/util"
xsi:schemaLocation="http://www.springframework.org/schema/beans http://www.springframework.org/schema/beans/spring-beans.xsd http://www.springframework.org/schema/util http://www.springframework.org/schema/util/spring-util-4.0.xsd">
<bean id="car_1" class="person.Car">
<property name="color" value="red"/>
<property name="speed" value="100"/>
<property name="price" value="1000"/>
</bean>
<bean id="car_2" class="person.Car">
<property name="color" value="yellow"/>
<property name="speed" value="200"/>
<property name="price" value="2000"/>
</bean>
<!--配置独立的集合 Bean 以供多个集合使用-->
<util:list id="cars">
<ref bean="car_1"/>
<ref bean="car_2"/>
</util:list>
<bean id="person_1" class="person.person">
<property name="name" value="ZhangSan"/>
<property name="age" value="21"/>
<property name="cars" ref="cars"/>
</bean>
</beans>person.java
1
2
3
4
5
6
7
8
9
10
11
12
13
14
15
16
17
18
19
20
21
22
23
24
25
26
27
28
29
30
31
32
33
34
35
36
37
38
39
40
41
42package person;/*
* @Author Sheng WenZeng
* @Date 2019/8/10 16:06
* @Version 1.0
*/
import java.util.List;
import java.util.Map;
/**
* @author Sheng Wenzeng
* @ClassName person
* @Description TODO
* @Date 2019/8/10 16:06
* @Version 1.0
*/
public class person {
private String name;
private int age;
private List<Car> cars;
public void setName(String name) {
this.name = name;
}
public String toString() {
return "person{" +
"name='" + name + '\'' +
", age=" + age +
", cars=" + cars +
'}';
}
public void setAge(int age) {
this.age = age;
}
public void setCars(List<Car> cars) {
this.cars = cars;
}
}Main.java
1
2
3
4
5
6
7
8
9
10
11
12
13
14
15
16
17
18
19
20
21
22
23package person;/*
* @Author Sheng WenZeng
* @Date 2019/8/10 16:13
* @Version 1.0
*/
import org.springframework.context.ApplicationContext;
import org.springframework.context.support.ClassPathXmlApplicationContext;
/**
* @author Sheng Wenzeng
* @ClassName Main
* @Description TODO
* @Date 2019/8/10 16:13
* @Version 1.0
*/
public class Main {
public static void main(String[] args) {
ApplicationContext applicationContext = new ClassPathXmlApplicationContext("applicationContext.xml");
person person = (person) applicationContext.getBean("person_1");
System.out.println(person.toString());
}
}输出结果:
1
person{name='ZhangSan', age=21, cars=[Car{color='red', speed=100, price=1000.0}, Car{color='yellow', speed=200, price=2000.0}]}
1.3.8 命名空间
为了简化XML文件的配置,越来越多的xml文件采用属性而非子元素配置信息
Spring从2.5版本引入了一个新的p命名空间,可以通过<bean>元素属性的方式配置Bean的属性
使用p命名空间后,基于XML的配置方式将进一步简化
需要在xml文件的首部加上:xmlns:p="http://www.springframework.org/schema/p"
applicationContext.xml
1 |
|
其中person_1和person_2的作用完全相同